Postman is a powerful API platform that is highly popular among developers. At times, users may require the use of a proxy while utilizing it. In this article, we will walk you through setting it up to use the system proxy and work flawlessly with OkeyProxy.
What is Postman API
Postman API is a comprehensive API platform, particularly favored for API testing purposes. This versatile tool empowers developers to effortlessly design, test, distribute, and document APIs within a user-friendly interface. The platform simplifies the API development process, enhancing efficiency and collaboration in development and testing tasks. These features make it a top choice among developers for various API-related activities.
Using Proxies in Postman
Between your device and the internet, a proxy acts as an intermediary. By connecting through a proxy, your requests are relayed to the target server by the proxy server instead of directly connecting to it. This process helps to mask your actual IP address. In Postman usage, a proxy plays a role as an intermediary between Postman and an API. It serves as a protective barrier that intercepts HTTP(S) responses on behalf of the client.
By default, the platform uses your local system’s configured proxy to send API requests or access the internet. If needed, you can enter authentication details for the default proxy in the desktop app. You can also configure the app to use the system proxy or a custom proxy when sending requests. If you are ready, download and install the Postman desktop app to begin.
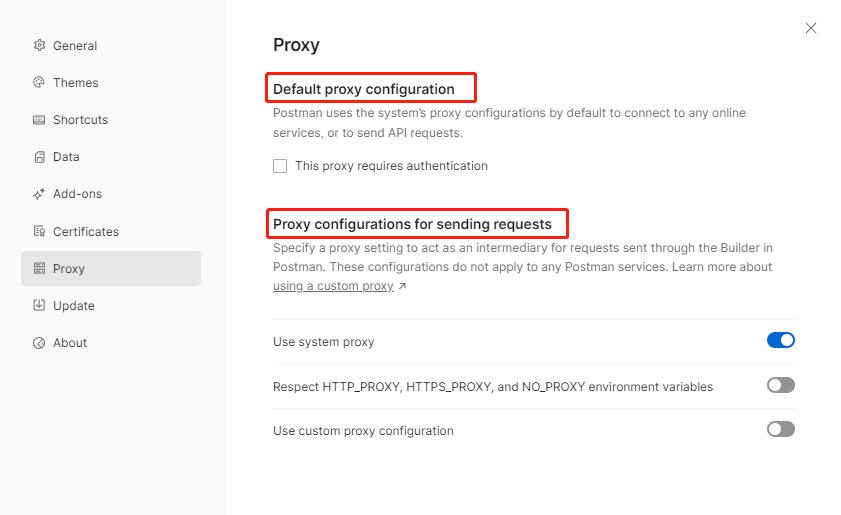
Download and install Postman
Postman API is available as a Chrome extension and a desktop client. The Chrome extension is only compatible with Chrome OS. It is recommended to opt for the desktop client as it offers additional features and a more user-friendly experience.
1. Download the app from: https://www.postman.com/downloads. Choose the version that suits your operating system, supporting Windows 64-bit, Mac (Intel Chip, Apple Chip) or Linux (x64, arm64).
2. Once the download process is completed, double-click on the installation package to install the app.
3. You will need to sign up when opening the application for the first time, if you don’t have an account yet, follow the on-screen instructions to create one.
If you need to access the internet through a proxy within the app, now you can start configuring it. You have the option to use a custom proxy or use the system proxy. Let’s take OkeyProxy as an example to demonstrate how to configure a custom proxy.
Custom Proxy Settings
You can set up a custom proxy to transmit API requests utilizing a proxy server other than your system proxy. This provides you with the flexibility to route HTTP requests, HTTPS requests, or both types of requests through this custom proxy as needed.
1. OkeyProxy Settings
a. Register a new account or log in to your existing one on the OkeyProxy Platform.
b. On the dashboard, navigate to the “Residential Proxies” section. Select “User Name Password” – “Endpoint generator”.
c. Pick your desired country and state for the IP in the location section.
d. Choose the session type as rotation or stickiness.
e. Select the output format “username:password@hostname: post”.
f. Fill in the number of proxies you require.
g. Click on “generate” then you can obtain the proxy address, port, username, and password.
OkeyProxy residential proxies support Socks5 and HTTP/HTTPS protocols.
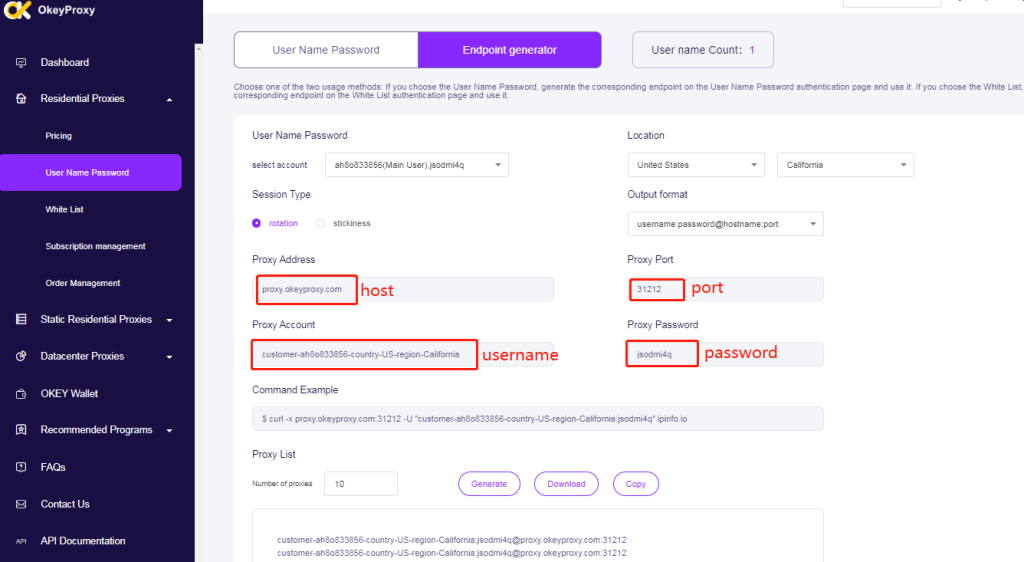
2. Postman Settings.
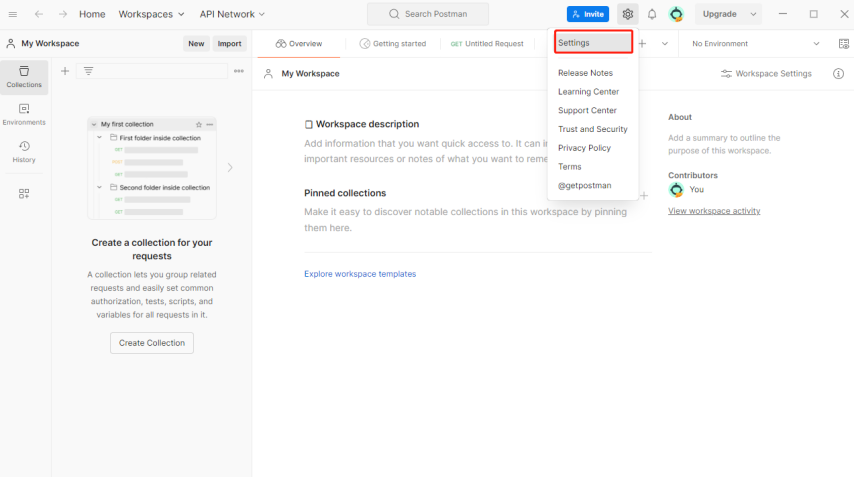
a. Click on the gear icon positioned at the top right corner and then select “Settings”.
b. Navigate to “Proxy”. Disable “Use system proxy”, and enable “Use custom proxy configuration”.
c. Select HTTP and HTTPS as the “Proxy type”. If both HTTP and HTTPS are selected, it means that both types of requests will pass through the proxy server.
d. Use the proxy address and port obtained from the OkeyProxy dashboard to input the details for the “Proxy server”.
e. Turn on “Proxy auth”. Enter username and password from your OkeyProxy endpoint generator.
f. You can specify hosts to bypass the proxy settings in “Proxy Bypass”. Once all settings are configured, it should resemble the image shown below.
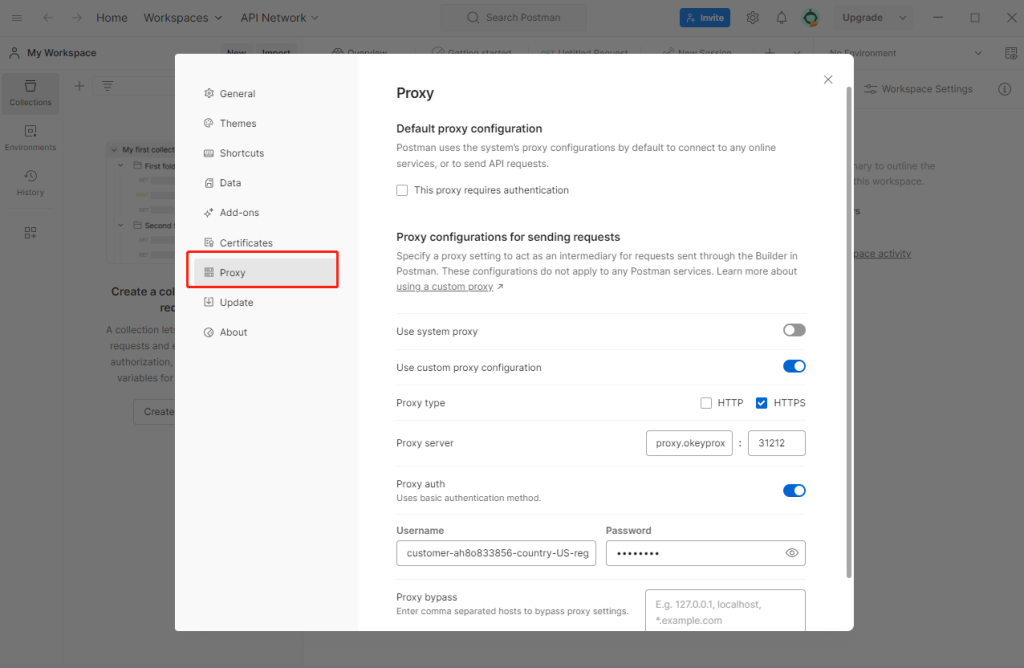
g. Close the window to finalize the setup process. You can revisit to ensure that the changes have been saved successfully.
By following these steps, you will be able to seamlessly integrate OkeyProxy into the app for efficient usage.
System Proxy Settings
Top-Notch Socks5/Http(s) Proxy Service

- Rotating Residential Proxies
- Static ISP Residential Proxies
- Datacenter Proxies
- More Custom Plans & Prices

Utilize the system proxy settings in Postman to route all your HTTP or HTTPS requests through your OS’s default setup. You are instructing the app and all its requests to adhere to your OS’s default configuration. In this case, Postman functions as a client, dispatching requests via your operating system’s default configuration, which then directs the request to the proxy server. The system proxy server forwards the request to the remote site server, and subsequently, the remote site responds through the proxy server.
1. Local System Proxy Settings
To configure a default proxy in your computer’s operating system, the process may vary depending on the operating system. Here is an example using Windows 10.
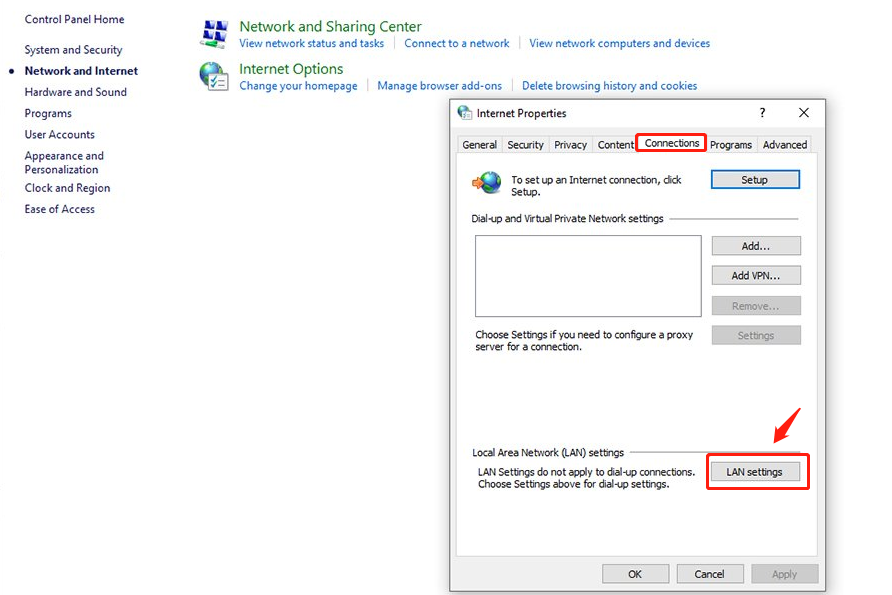
a. Open the Control Panel and select the “Network and Internet” option.
b. Click on the “Internet Options” link to open the Internet Properties window.
c. In the Internet Properties window, go to the “Connections” tab and click on the “LAN settings” button.
d. In the LAN Settings window, check the box for “Use a proxy server” and enter the proxy server address and port number.
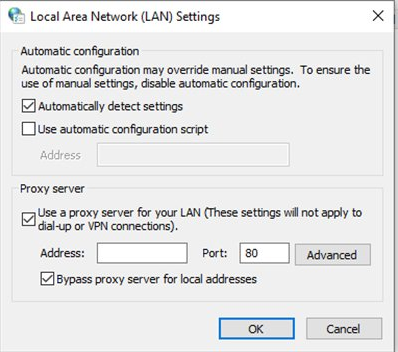
e. If proxy authentication is required, check the “Require authentication” option and provide the username and password.
f. Click the “OK” button to save the proxy settings.
2. Postman Settings
a. Ensure that your system’s proxy server is correctly configured and enabled.
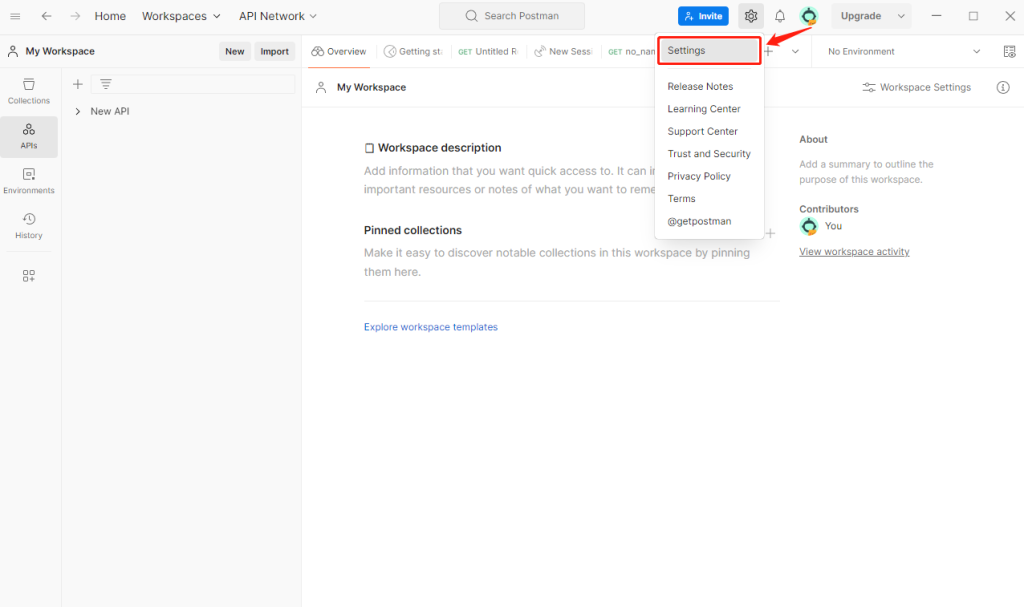
b. On the main interface of the app, click on the gear icon in the top right corner and select the “Settings” option.
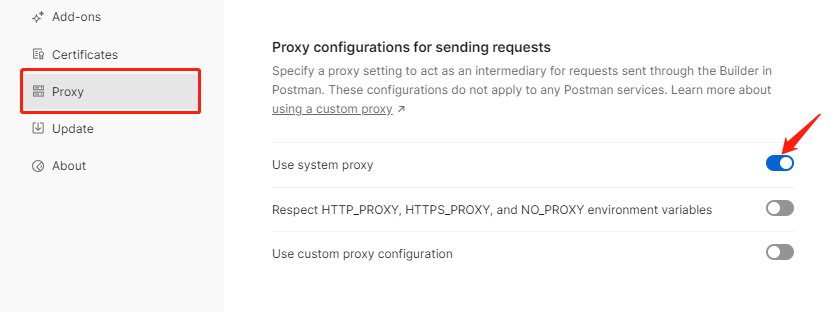
c. In the settings interface, choose the “Proxy” tab. Then in the proxy settings, enable the “Use System Proxy” option. You have the option to toggle “Use the system proxy” on or off to activate or deactivate the system proxy. When unchecked, all requests are directly sent from your device. Ensure that the toggle for “Use custom proxy configuration” is switched off. If both the system proxy and custom proxy settings are activated, it will prioritize the custom proxy configuration.
d. Click “x” to save the proxy settings.
e. Create or open an API request.
f. In the request’s “Settings” tab, make sure the proxy is set to “System Proxy.”
g. Click the “Send” button to send the API request and wait for the response.
OkeyProxy – the Best Proxy for Postman
OkeyProxy offers a range of features that cater to API-related tasks, enhancing the overall experience and functionality when using Postman. OkeyProxy boasts fast speeds, which are crucial for efficient API communication. This ensures that your requests are processed swiftly, leading to a more seamless API workflow. And the reliability of connections is paramount for uninterrupted API processes. A stable connection minimizes downtime and ensures that your API requests are consistently delivered and received. By using OkeyProxy with Postman, you can optimize your API performance.
OkeyProxy allows users to experience its advantages through a free trial period now. This provides an opportunity to test its capabilities and understand how it can benefit your API tasks.
Get 1 GB Free Proxy Trial Now!
Wrapping Up
Postman stands out as a robust API platform, offering the flexibility to configure proxies tailored to your API requirements. OkeyProxy, with its array of premium features, is the ideal choice to pair with this platform. It’s fast speeds and reliable connections ensure your seamless API process with a proxy.

