Using a proxy on Chrome can enhance browsing privacy, allow access to geo-restricted content, and protect data from malicious actors. This guide covers how to configure and use proxies on Chrome, whether to bypass restrictions, boost security, or explore online anonymity.
What Is Setup Proxy on Chrome Meaning ?
A proxy server acts as an intermediary between the user’s device and the internet. Chrome proxy settings enable the browser to route its traffic through a proxy server. This rerouting can provide users with a different IP address, making it appear as if they are browsing from a different location.
Why Chrome Proxy Settings is Necessary?
Configuring a proxy for Chrome has several benefits:
- Privacy Protection: Proxies hide your IP address, adding an extra layer of anonymity.
- Access to Geo-Restricted Content: Many users set up proxies to bypass geo-blocks on websites and streaming platforms.
- Improved Security: Proxies filter out malicious websites and act as a buffer against online threats.
- Content Filtering: Businesses and educational institutions can use proxies to restrict access to certain sites or content.
How to Change Proxy Settings in Chrome?
Chrome proxy settings are linked to the operating system (OS) settings, so changing them on Chrome will affect the entire system. Below are the methods for setting up a proxy in Chrome on different platforms.
1. Configure Proxy Settings on Windows
- Open Chrome and click on the three-dot menu in the top-right corner.
- Go to Settings > System > Open your computer’s proxy settings.

-
In the Proxy Settings window, you have the option to set up:
Automatic Proxy Setup: Enables configuration scripts for automatic proxy.
Manual Proxy Setup: Enter the IP address and port number manually.
- Once configured, Save the changes and close the settings. Chrome will now route traffic through the specified proxy.
2. Chrome Set Proxy on macOS
- Open Chrome and navigate to Settings.
- Select System > Open your computer’s proxy settings.
- In the System Preferences window, select Proxies.
- Enable the desired protocols (HTTP, HTTPS, or SOCKS) and enter the IP address and Port number.
- Click OK to save changes, and Chrome will automatically use the proxy settings specified in macOS.
3. Proxy Server Settings in Chrome of Linux
- Open Chrome, click on the three dots, and go to Settings > System > Open your computer’s proxy settings.
- In the Network Settings, select Manual and enter the IP address and port.
- Confirm and save your settings, which will configure the proxy for Chrome and other applications on the system.
Installation of Proxy Extensions in Chrome
For users who want control over which websites to access through a proxy, Chrome proxy extensions can offer a streamlined experience. These extensions provide easy proxy management directly within the browser.
Recommended Chrome Proxy Extensions
- Proxy SwitchyOmega: Allows users to switch between multiple proxies and provides an intuitive interface.
- FoxyProxy: Automatically switches proxy servers based on user-defined rules for optimal control.
Steps to Set Up a Proxy in Chrome with OkeyProxy
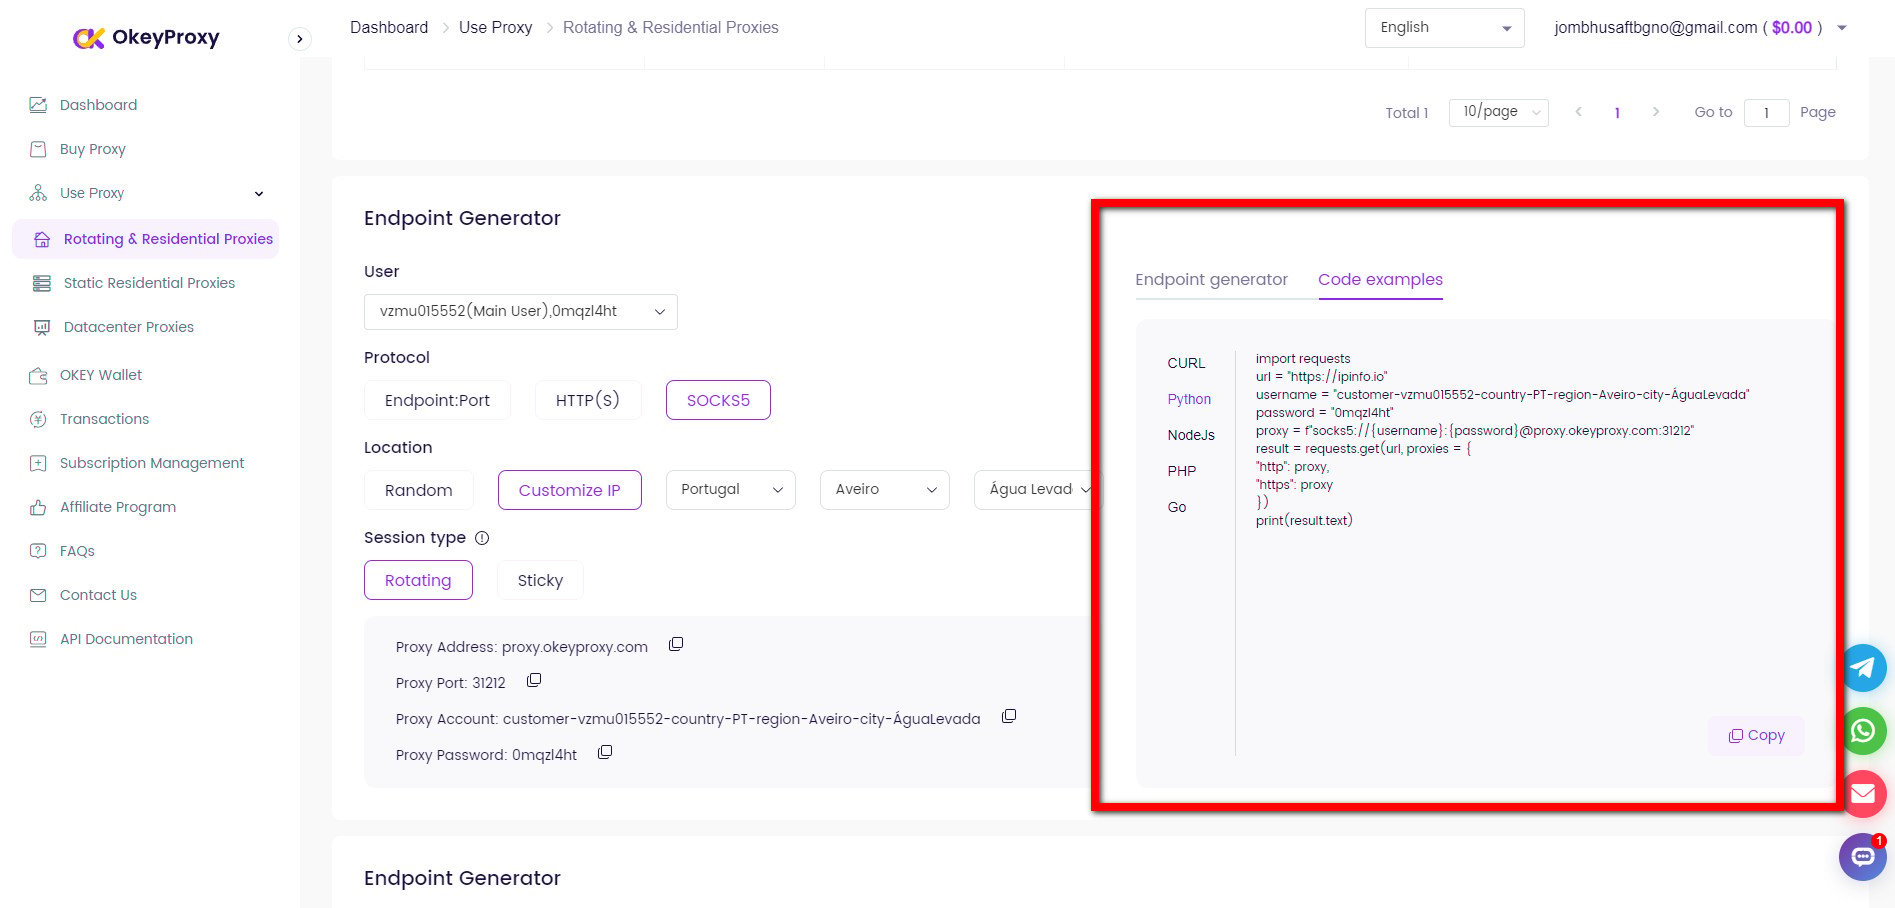
OkeyProxy provides stable and fast proxy services suitable for users who need enhanced privacy and unrestricted access to content. Here’s how to configure it on Chrome manually, as OkeyProxy does not have an extension:
- Sign up with OkeyProxy to get access to their proxy server details.
- Follow the OS-specific instructions above (for Windows, macOS, or Linux) to enter the IP address and Port number provided by OkeyProxy.
- Save the settings, and Chrome will route traffic through the OkeyProxy server for increased privacy and security.

Solution for Proxy Settings Issues in Chrome
If Chrome is not connecting properly with a proxy, consider these troubleshooting tips:
- Clear Cache and Cookies: Sometimes, residual data interferes with proxy connections.
- Check Proxy Settings: Ensure that the correct IP and port are entered.
- Disable Other Extensions: Some extensions may conflict with proxy settings, so disable them temporarily if needed.
- Use an Updated Proxy Server: Free proxies can be unreliable. Consider using a reputable provider like OkeyProxy for a reliable connection.
Tips about Chrome Browser Proxy Settings
- Use HTTPS Proxies: For added security, use proxies that support HTTPS to encrypt traffic.
- Change Proxy Regularly: Rotate IP addresses frequently to reduce the risk of detection or blocking.
- Consider a Paid Proxy Service: Paid services like OkeyProxy provide better speeds, stable connections, and enhanced security over free proxies.
Conclusion
Configuring a proxy on Chrome is a straightforward way to increase privacy, bypass content restrictions, and maintain control over browsing security. Chrome’s integration with the system settings makes it easy to set up a proxy, and with global server locations, trusted providers like OkeyProxy offer secure, high-speed proxy services for Chrome browser proxy settings.


