Sometimes, managing multiple proxies and switching between them can be cumbersome. Proxy SwitchyOmega addresses this issue, enabling users to manage and switch between proxies effortlessly. From this article, you’ll grasp comprehensive information about Proxy SwitchyOmega, what is proxy SwitchyOmega, Chrome Proxy SwitchyOmega’s main features and applications, proxy SwitchyOmega download, and how to use proxy SwitchyOmega.
What is Proxy SwitchyOmega?
Proxy SwitchyOmega is an innovative tool designed to simplify managing multiple proxies. It works with Chrome and Firefox and is one of the simplest proxy management solutions. It allows users to switch between proxies swiftly without having to navigate through numerous settings. This extension offers a seamless experience, making it a go-to tool for many internet users, developers, and SEO professionals.
Main Eigenschaften Of Using Proxy SwitchyOmega
1. Easy Proxy Switching: The extension allows users to switch between multiple proxies easily. Users can create proxy profiles with different settings and switch between them with just a click.
2. Auto Switch Mode: This feature allows users to set specific rules for different websites. The extension will automatically switch to the appropriate proxy based on these rules when users access these websites.
3. URL Wildcard Matching: This feature enables users to use wildcard characters to match multiple URLs, making it easier to set rules for websites.
4. Support for PAC Scripts: The extension supports PAC (Proxy Auto-Config) scripts, allowing advanced users to define complex rules for proxy usage.
5. User-Friendly Interface: The extension offers a user-friendly interface, making it easy even for non-tech-savvy users to manage and switch between proxies.
The Innovation Behind Proxy SwitchyOmega
The true innovation of the extension lies in its ability to simplify a complex process. By offering a user-friendly interface and a variety of features, it has transformed the way users manage and switch between proxies.
The Auto Switch Mode, for instance, is a game-changer. It allows users to set rules for different websites, freeing them from the hassle of manually switching between proxies. The extension automatically selects the appropriate proxy based on the rules set by the user.
The support for PAC scripts is another innovative feature. It caters to advanced users who wish to define complex rules for proxy usage. This feature provides flexibility and control, allowing users to tailor their proxy usage to their specific needs.
Applications of Proxy SwitchyOmega
The extension has a wide range of applications. It’s a valuable tool for users who regularly use proxies, including:
1. Individual Users: For individuals who value their privacy or wish to access geo-restricted content, the extension allows the users to switch between proxies conveniently.
2. Developers: Developers usually need to test their applications under different network conditions. The extension allows them to switch between local and global proxies swiftly.
3. SEO Professionals: Most SEO professionals need to analyze search results from different geographical locations. With this extension, they could easily switch between proxies from different regions and countries.
Empfohlene Proxy-Lieferanten: Okeyproxy - Top 5 Socks5 Proxy Provider mit 150M+ Residential Proxies aus 200+ Ländern.
Holen Sie sich jetzt eine $9/3GB Testversion von Residential Proxies!
How To Choose A Proxy Used With Proxy SwitchyOmega?
If you need to automate rotation or choose a proxy that does not have built-in functionality, SwitchyOmega proves to be a suitable tool. Particularly, when you use Proxys für Rechenzentren to operate scraping tasks, you can undoubtedly extend its lifecycle with session management through this extension. And if you need to use Statische Anwohnervertretungen for various websites without any built-in proxy – SwitchyOmega is also the perfect tool for automatic IP switching in a rotating structure of proxies. OkeyProxy customer support will analyze your use case and recommend the right IP choice for the task.
Proxy SwitchyOmega Download
The first step to a more streamlined proxy management experience is to install SwitchyOmega. And the process is quite quick and easy, only taking a few clicks. Here’s how to get started.
Open your preferred browser—Chrome or Firefox, and head to the extension marketplace. Once there, use the search bar to type in “SwitchyOmega” and hit enter. Or you can find it here directly:
A. Proxy SwitchyOmega Chrome:
https://chromewebstore.google.com/detail/proxy-switchyomega/padekgcemlokbadohgkifijomclgjgif
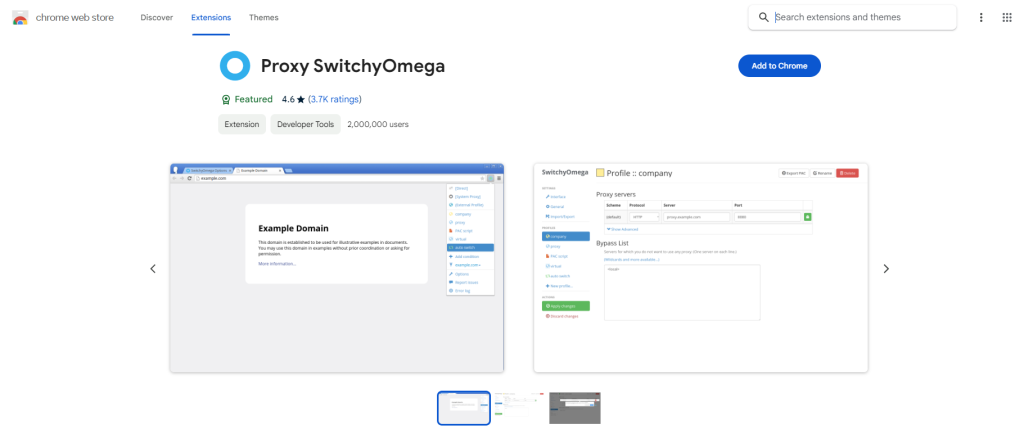
B. Proxy SwitchyOmega Firefox:
https://addons.mozilla.org/en-US/firefox/addon/switchyomega/versions/
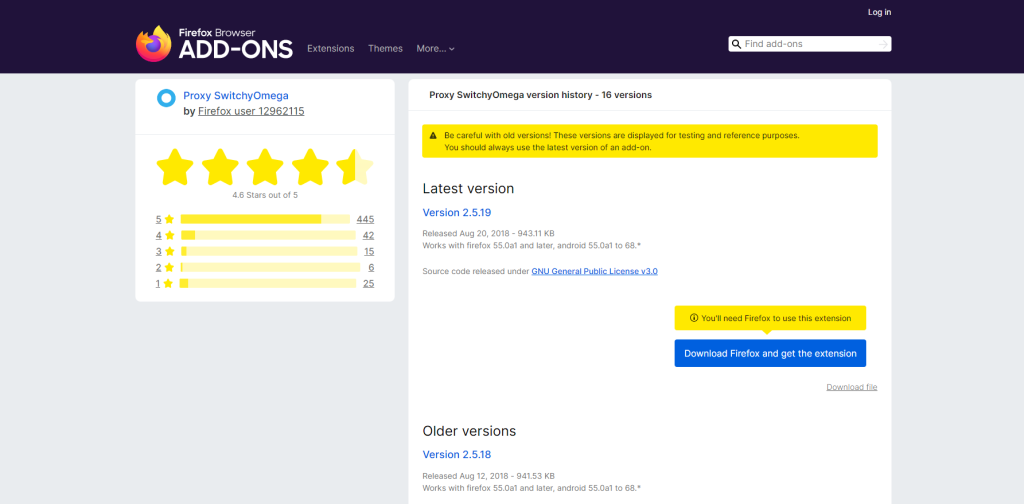
2. Install the extension.
You will see SwitchyOmega listed in the search results. Click it to go to the extension’s dedicated page. Here you will find the “Add to (browser)” button, it depends on your browser. Click this button and a pop-up window will appear asking for permission to access specific data or functionality. This is standard procedure for most extensions. Click Add extension to complete the installation.
3. Confirm installation.
After a few moments, the installation will be complete and you will see a notification confirming the installation. You’ll also notice the SwitchyOmega icon appearing next to your browser’s address bar.
How To Use Proxy SwitchyOmega With OkeyProxy?
Now that you’ve successfully installed SwitchyOmega, it’s time to configure it to your specific needs. We’ll take the Chrome extension Proxy SwitchyOmega as an example.
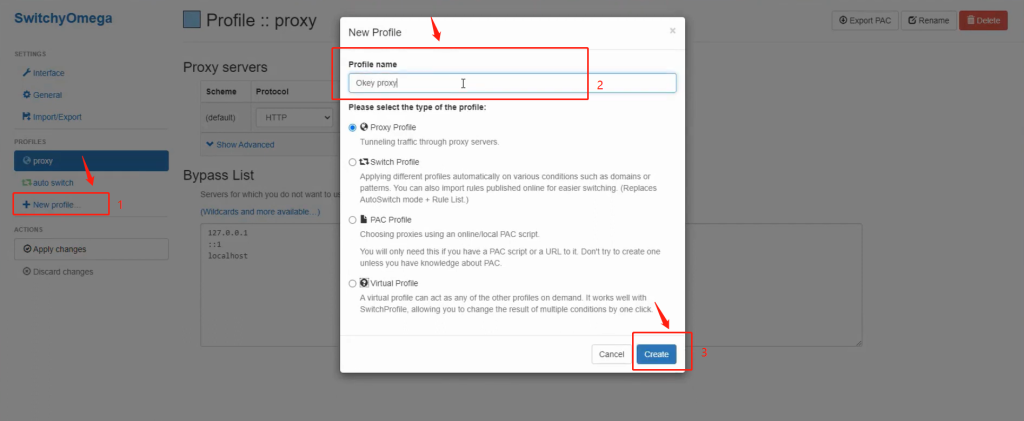
Schritt 1 Create a new profile and name it “Okey Proxy”, then click the “Create” button.
Schritt 2 Add proxy servers, and select a protocol as you need.
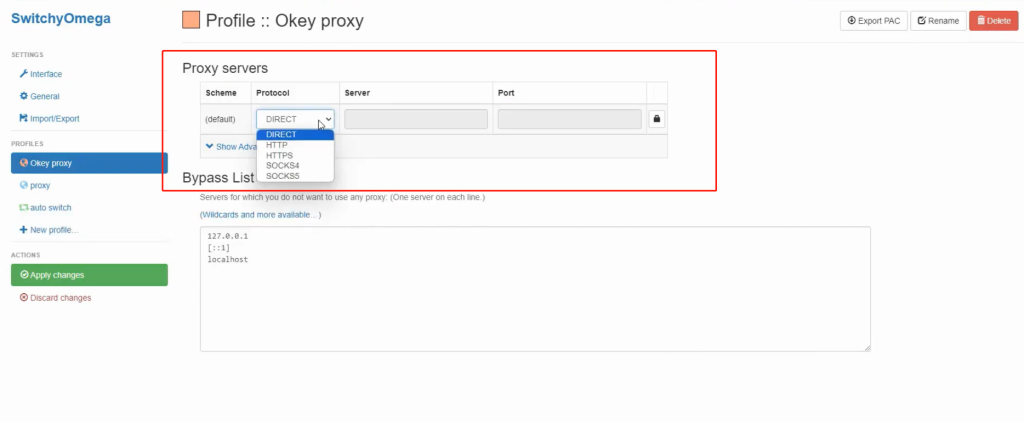
Schritt 3 Get the Proxy server IP and port from OkeyProxy, generate it, and copy and paste.
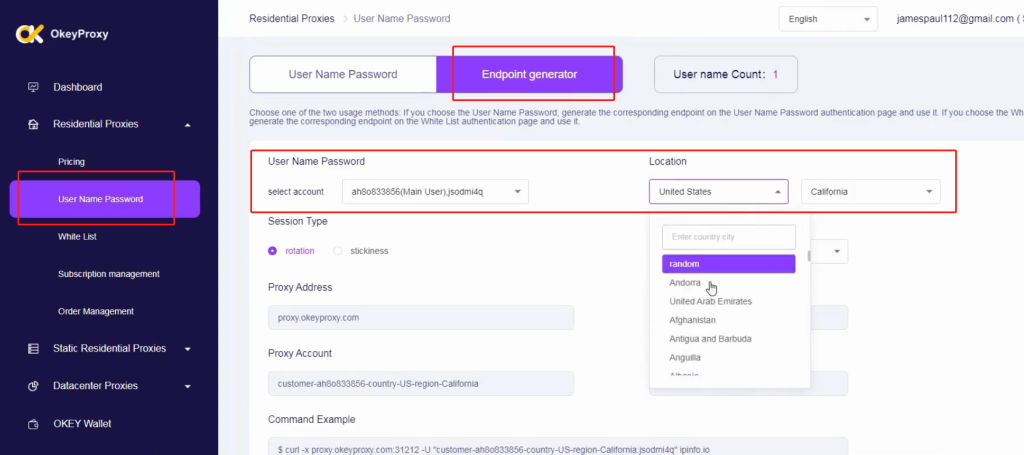
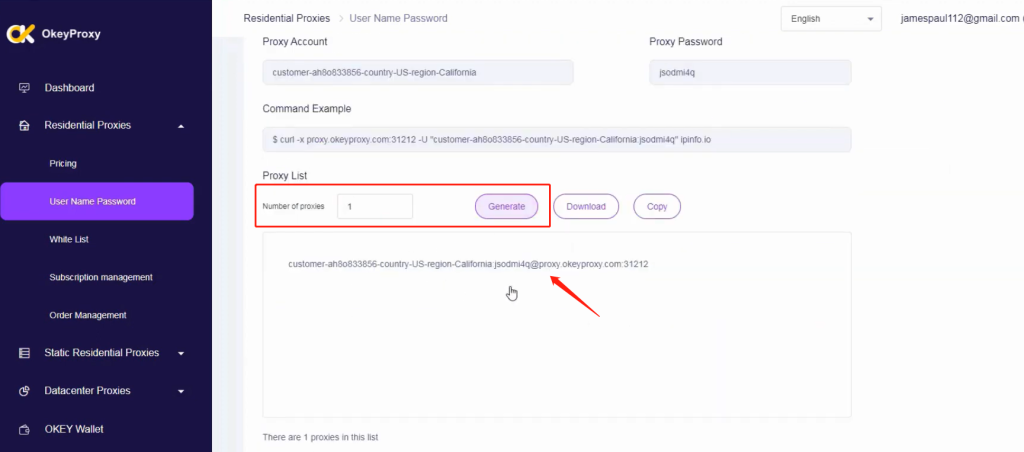
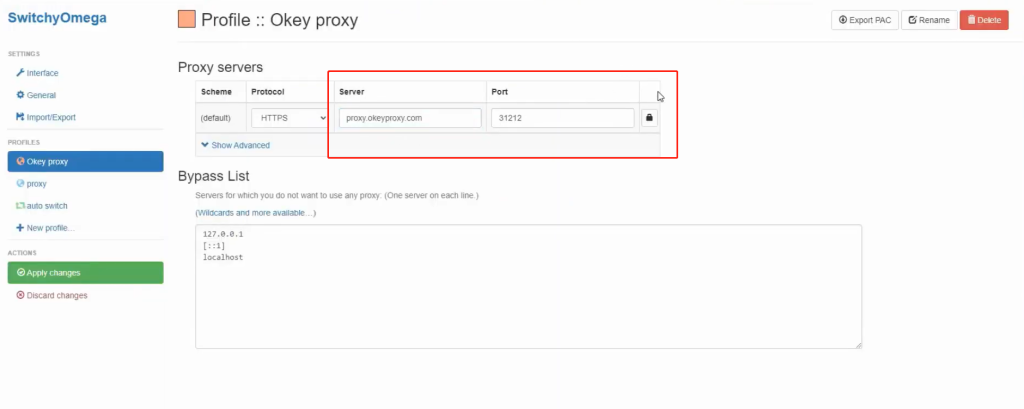
Step 4 Click the lock icon to add “proxy Authentication” from OkeyProxy.
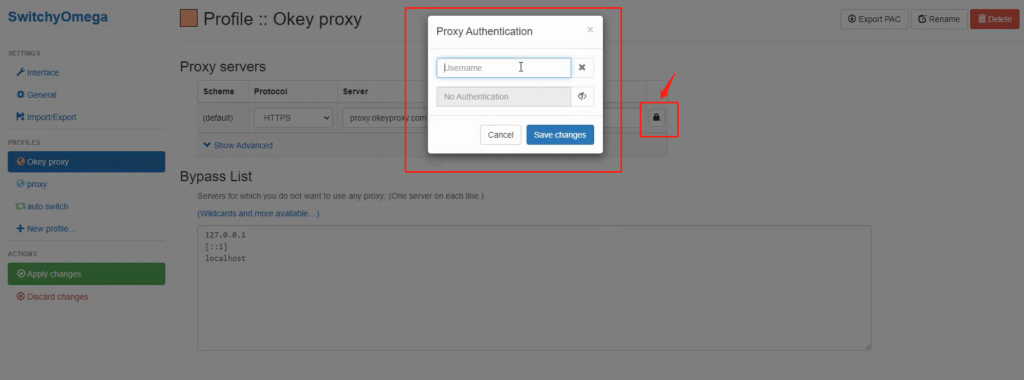
Step 5 Copy the “Username” and “password” from the OkeyProxy dashboard and paste them in the “proxy Authentication”, then you can “Save Changes”.
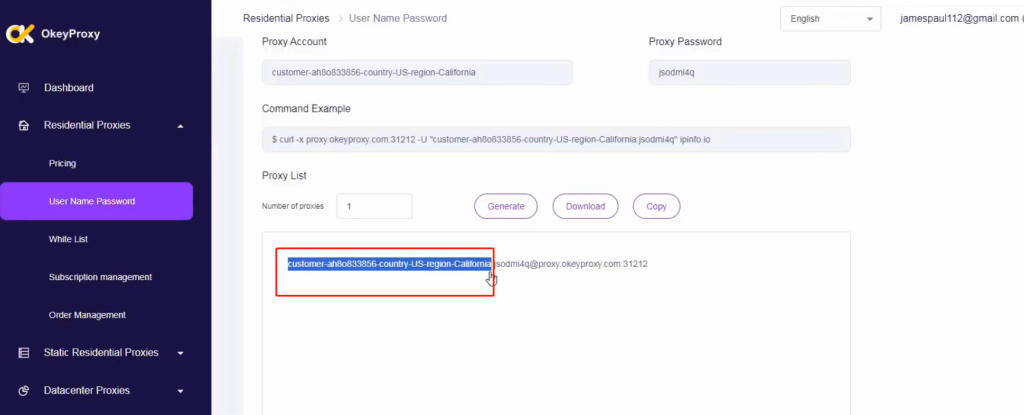
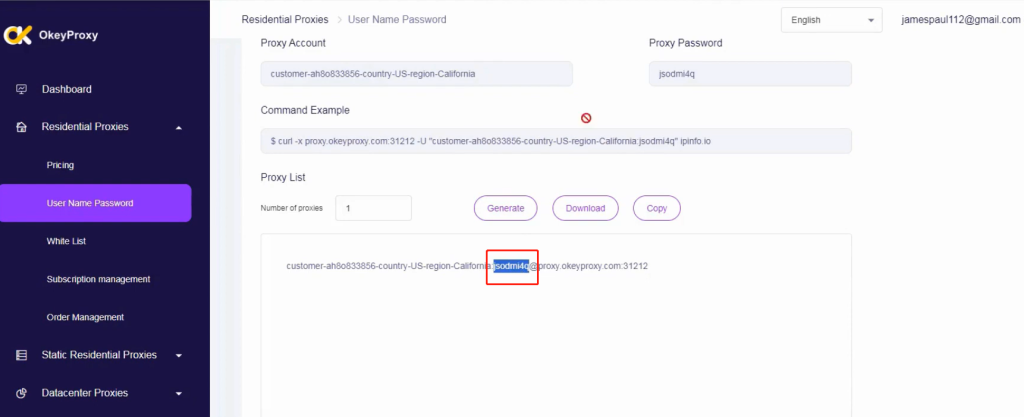
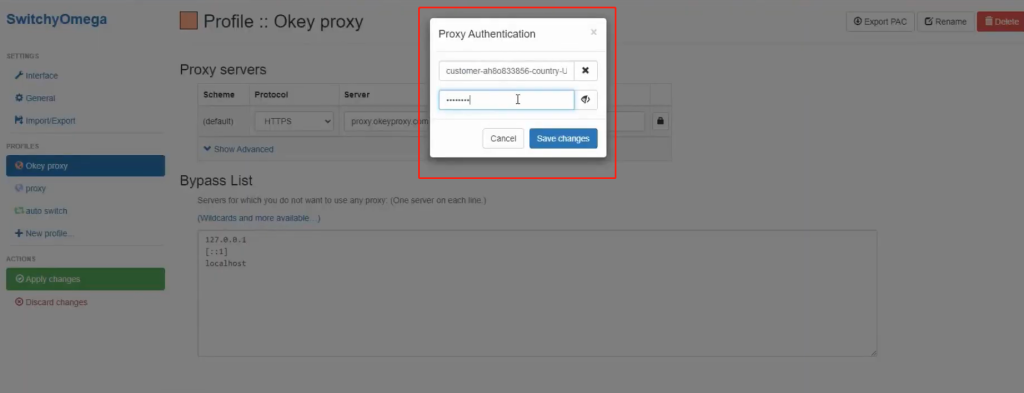
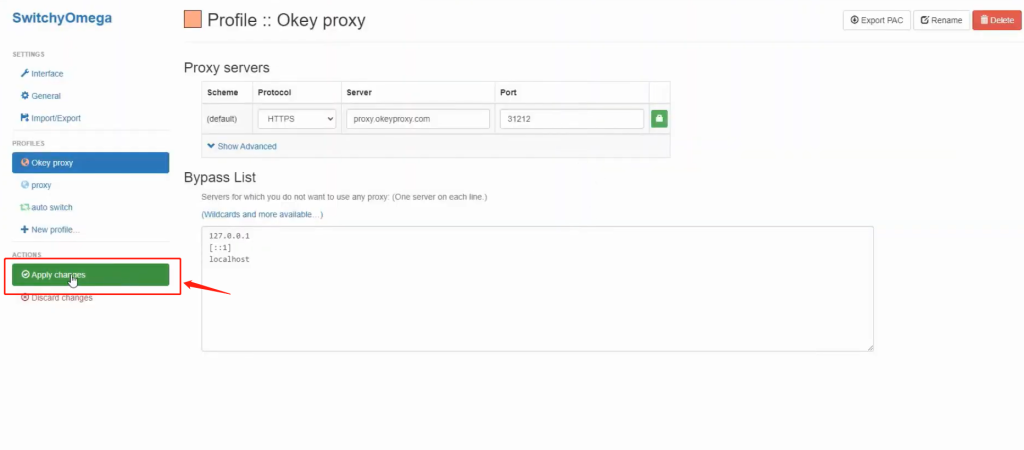
Step 6 Apply changes.
Step 7 Start to activate the “Proxy SwitchyOmega” extension and select “OkeyProxy”.
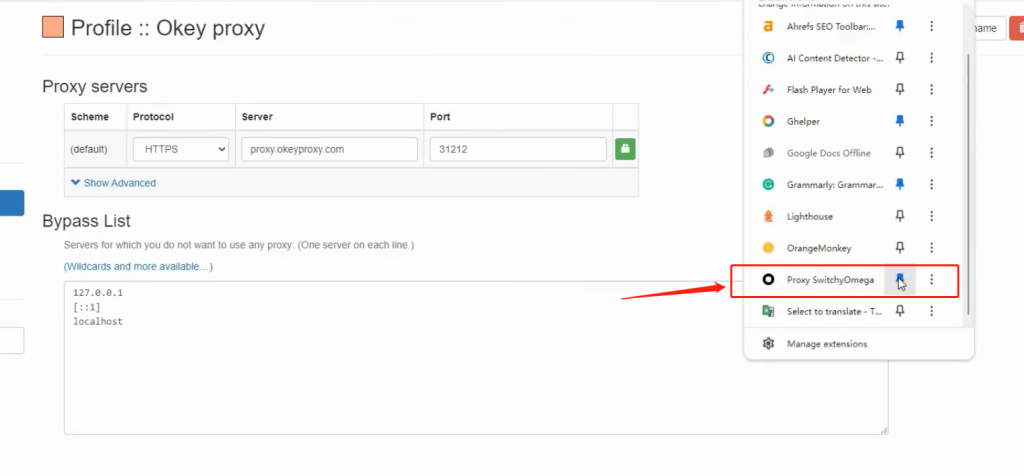
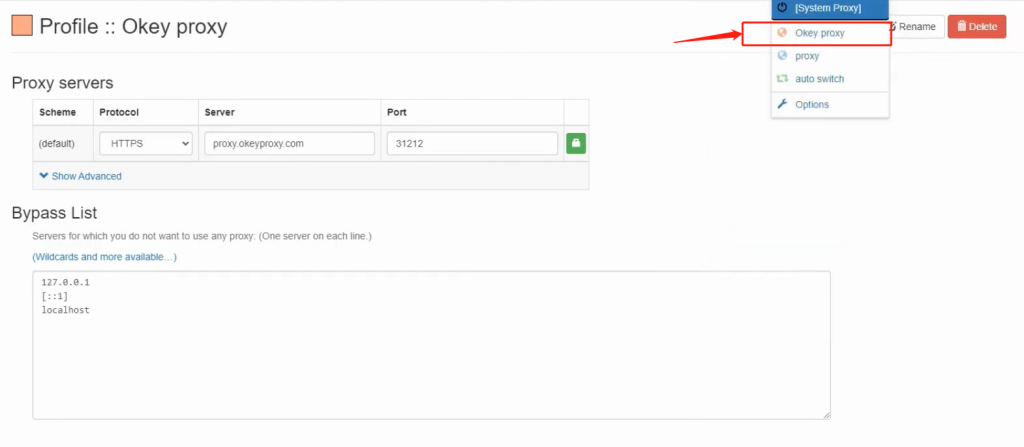
Congratulations! You’ve made it!
Empfohlene Proxy-Lieferanten: Okeyproxy - Top 5 Socks5 Proxy Provider mit 150M+ Residential Proxies aus 200+ Ländern.
Get $9/3GB Trial of Residential Proxies Now!
Youtube Video Anleitung: How to integrate OkeyProxy with Proxy SwitchyOmega In Chrome.
Schlussfolgerung
Proxy SwitchyOmega is revolutionizing the way we use proxies. It simplifies the process of managing and switching between multiple proxies, making it an essential tool for many internet users. Its innovative features and user-friendly interface make it a powerful tool that caters to both beginners and advanced users. Proxy SwitchyOmega is not just a tool; it’s a step forward in the world of proxies.
Related Article:
https://www.okeyproxy.com/proxy/how-to-use-bp-proxy-switcher-chrome-extension/
https://www.okeyproxy.com/proxy/setup-proxy-helper-in-chrome-browser/
FAQ about Proxy SwitchyOmega
Is Proxy SwitchyOmega secure?
It is secure for Proxy SwitchyOmega itself, but the security of your browsing depends on the proxy servers you use. Always remember to use worthy trusted and reliable proxy servers like OkeyProxy to ensure your data is protected.
Why is the proxy not working with Proxy SwitchyOmega?
Check out these factors carefully that may cause the problem.
Incorrect proxy settings: Double-check the proxy server address, port number, and authentication details.
Proxy server downtime: The proxy server might be temporarily unavailable.
Network restrictions: Your network might have restrictions that prevent proxy usage.
Browser conflicts: Ensure no other proxy extensions are interfering with Proxy SwitchyOmega.
Could you export and import Proxy SwitchyOmega settings?
Certainly, you can export and import settings to share configurations between various browsers or devices.
Here’s how you do with export settings: Just open Proxy SwitchyOmega options and click on the “Export” button. After that, save the configuration file.
The import settings are similar. Also, open Proxy SwitchyOmega options to click on the “Import” instead of the “Export” button this time. Then you can upload the previously saved configuration file successfully.

